What is a Lettering Pass? Tips And A Free Checklist for Comic Writers

As a comic writer turned editor/letterer, it wasn’t until I started lettering that I realized how important a lettering pass is. Adding a lettering pass to your scripting process will make you a better collaborator, cut down the time that your letterer spends on extra stuff that isn’t important, and help your team hit deadlines. If you want to be the sort of writer that letterers love working with, these tips will be helpful. As writers, our goal should always be to make the creative process easier for our collaborators.

So what is it? The lettering pass is a review of the script that should happen when you get your art back from the artist or colorist. The writer should go through the script and, at a minimum, make sure the script matches what the artist drew, and that the script is free of errors.

Most letterers can letter over black and white pages, but many of us prefer full color so we can match the palette when creating SFX and other things that might need color.

This post will include information that can be helpful to any of your collaborators, but I wanted to focus specifically on lettering. If you want to do a true deep dive into the lettering process, I recommend The Essential Guide to Comic Lettering by Nate Piekos.

Until you can give that a read, I hope this will help you understand some of the basic things that will make it easy on your letterer and ensure your comic looks fantastic! I’ve even made a printable PDF document you can use to check things off the list, with helpful visual reminders. You can find it at the bottom of this post.


8 Things To Check Before Handing Your Script And Art Over To Your Letterer

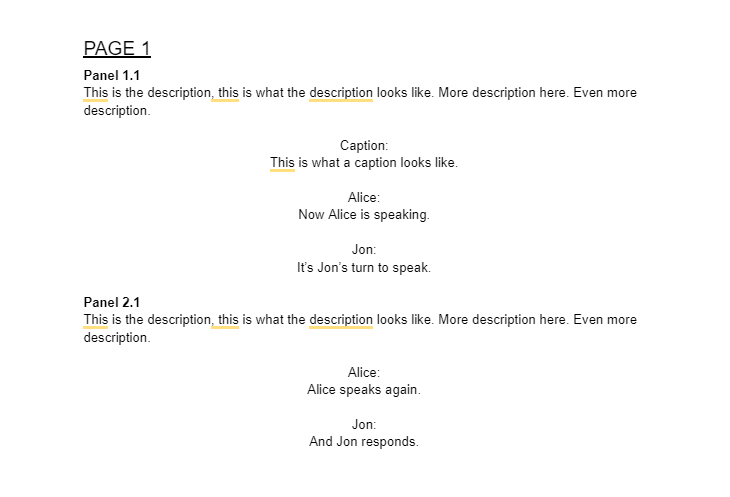
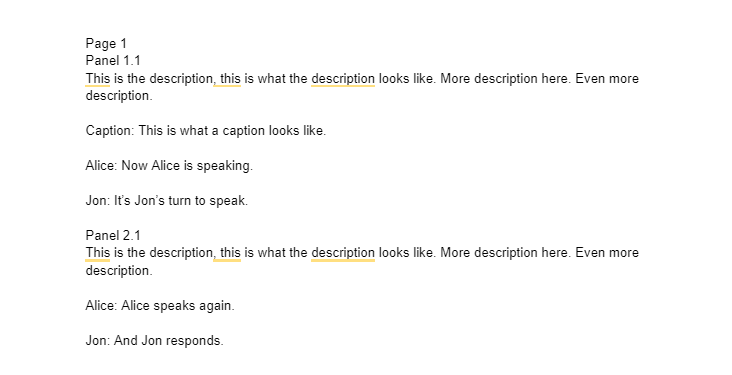
1. The script is formatted and easy to read.

In comics, there are no strict rules on what a comic script needs to look like, but I can tell you a few things that will help or hinder your collaborators:

Help: Page breaks for each comic page. Descriptions and dialogue/captions are visually distinct, either via numbering or alignment. Page/panel number using either headings or bolding to clearly show new pages/panels.

Hinder: No formatting at all. All text is the same weight. No page breaks. No line breaks for dialogues/captions.

Formatted Script Example
Unformatted Script Example

2. The script matches the art on the page.

If the artist has made changes to the script (adding panels, removing panels, not leaving space for text, etc), your script should reflect those changes so the letterer doesn’t have to guess or email you several times to figure out what you want lettered on the page.

3. Use a document type that can easily be copy/pasted from.

I personally prefer either Google Docs or Word Docs. These document types make it easy for your letterer to copy/paste your dialogue and captions directly into their lettering document, which can avoid a ton of errors. Most letterers don’t like PDFs, because they formatting and are not easy to copy/paste from, so I would avoid using them with letterers. Even if the letter can copy/paste from the PDF, I’ve found it adds paragraph and line breaks that I have to account for and fix, which adds extra time to the lettering process.

4. Proofread your script and correct errors before sending it to the letterer.

Your lettering may do basic proofreading, but it’s really not their job to make corrections. You want to avoid making proofreading corrections once the pages are lettered. If you are asking for proofreading corrections to lettered pages, you will be adding extra, unnecessary work for your letterer. Adding commas and correcting the script takes a few seconds, making multiple corrections to various pages could take several minutes to an hour or more for your letterer, depending on the amount of corrections.

5. Less is more, or at least it can be, when it comes to text in comics.

A good rule of thumb is that you can have about 210 words per page without the page looking too full. This is a guideline, not a rule, but I will tell you if you fill entire pages repeatedly with as many words as possible, you will likely stress out your letterer and possibly your art team. Rely on the art to tell the story, that is the magic of comics. Some of the best comics I’ve worked on and read have far fewer words per panel than what’s listed here. Overfilling your panels will make your comic look older, because that was more common way back when.

Basic rules to follow (and break, once in a while):

26 words per balloon (Alan Moore)

3 balloons per panel (Warren Ellis)

3 lines of text per balloon (Ed Brubaker)

Divide 210 by the number of panels. For example, 4 panels – 52 words per panel.

6. Avoid ALL CAPS when scripting.

It’s really difficult to read (I say this both as an editor and a letterer, you don’t want barriers like this for your collaborators). Letterers will advise you not to use it in dialogue, but personally, I don’t love it in descriptions either. You want your script to be easy and accessible to read.

7. The first speaker is generally on the left side of the panel.

This rule can be broken, but break it sparingly. If you are constantly putting the first speaker on the right side, the letterer is going to have to get creative to make sure the reader knows who is speaking first. If you have multiple speakers, check the order of their speaking vs. how they are drawn on the page, and swap things around if you need to.

8. Include the printing dimensions for your comic.

Comic printing companies usually have a guide on their website that gives you an exact idea of what the comic size will be and what their bleed/trim/safe zone is for it. A professional letterer will create their lettering template to match those exact specifications, which will ensure that nothing gets cut off during the printing process. Jamie McKelvie has a great post that outlines the importance of printing dimensions and bleed/trim/safe zones here.

Checklist PDF

Grab the printable PDF Checklist here, the preview of it is below.

Self-Editing Checklist – 10 Steps to Help You Edit Your Comic Script

I’ve done a lot of comic editing in the last few months and it got me thinking about the common issues I see in comic scripts. I’ve definitely made these mistakes in my own stories, so I created an easy-to-follow checklist to help avoid these issues. It’s 10 simple steps you can use to double-check your comic script before you pass it along to an artist or editor.

Check out the preview and download it by clicking the button!

The Pros and Cons of Project Management Software for Comic Creators

For the past few years, I’ve worked as a project manager, which meant I got acquainted with many different systems to manage those projects. There are pros and cons to each software, but ideally, you just have to figure out what works best for your brain and the people you’re working with.

Google Sheets/Docs

A spreadsheet in Google Sheets can be a very versatile tool. Even if you decide to use more involved software like Trello or Asana, having a spreadsheet to keep track of what you still need to finish and what is finished is a straightforward and visual way to see how the work is going.

You can also take a screenshot and quickly share progress with collaborators, which is excellent if you have a large team. I had a friend do this recently, and I’m still amazed at how simple and genius it was. We all instantly knew which parts of the project were finished and what stages the art was in. It was an excellent way to show us how hard the editorial team was working while keeping us updated overall.

You could also share the link to your Google Sheet with your team, but I honestly liked the screenshot better. I tend to have the urge to help organize things, and the screenshot didn’t pull at that part of my brain. If someone shares the Sheet, especially if the project is behind or struggling, it may cause people on the team to feel like they need to pitch in on the editorial/project management side, and you could end up with too many cooks in your kitchen. If you want to share the link without tempting people to help out, there are ways to share “view-only” versions of Google Sheets

Pros

  • Free to use, the only limit is 15gbs of files.
  • Easy to share with collaborators, either via screenshots or direct links.
  • Fairly easy to learn, if you’re unsure how to do something most skills are just a search away.

Cons

  • You do have to create the sheet, so the level of organization depends on your personal skills.
  • It’s fairly basic, compared to more detailed software. Not a total con, but still something to consider.

Trello

Trello is very visual and I liked that a lot at first. It works best for list-based projects, and cards within a list can be labeled with color-coding for easier at-a-glance understanding. As seen here, companies like Epic Games use Trello to share progress on bugs and issues with their community. While I like it for more basic project management, it can feel a little unwieldy for more complex projects.

As projects got more complicated and the lists got more numerous, the boards started to feel somewhat overwhelming and a little challenging to keep track of. You can use the search feature to find a specific card, but even that felt a little daunting at times.

If you opt to use Trello, you may want to consider breaking things up into more than one board so scrolling does not overwhelm those working on the project.

Pros

  • Very visual, great for folks that need to see the entire project.
  • Assignable tasks.
  • Free for up to 10 boards, includes unlimited cards and unlimited members. Paid version starts at $10 per month (billed annually).

Cons

  • Because you can only fit so many cards on a page, you could lose sight of pieces of the project.
  • Cards can get a little overwhelming if you’re trying to store a lot of visual information or a lot of files.

Asana

When I first started using Asana for a client, I was really hesitant. At first glance, it seems a bit overwhelming, but as I used the software more and after I took a short class (3 days, 45 minutes-1 hour per day), it quickly became my favorite project management software. I have a personal brand I use to keep track of my tasks, both for work and life.

The calendar view is by far my favorite feature. I can look at all my upcoming tasks and see them mapped out with color-coding, so it’s easy to view where I am currently and where I’m headed throughout the month.

Pros

  • List, Calendar and Inbox views make it easy to see when tasks are due and what tasks are coming up next.
  • It’s easy to share tasks with other people on the project.
  • Free for unlimited tasks/projects, includes up to 15 teammates. Paid version starts at $10.99 per month (billed annually).

Cons

  • There is a pretty big learning curve at first. I actually took a short class that taught me the basics, and it was 100% worth it.
  • Some features that are rather useful are behind a paywall, like date-ranges.

If you’re trying to decide what project management software works best for you, I hope this post has been insightful! If you have any questions, feel free to comment below or reach out on twitter @TamingTheMuse.

Learn to Take Your Own Advice

I’ve been writing stories for as long as I can remember. I still have bits and pieces of shorts I wrote when I was young, and somewhere buried in a notebook, I have a “Noir” story I tried to write in high school. My heart was in the right place, but my skills were lagging behind.

I got more serious about writing in my 20s, even as I pursued my teaching degree and taught professionally. In 2013 we moved to Wyoming, and I took a break from teaching. I got my first traditional publishing opportunity the following year, and after that, I took a lot of classes on writing fiction and comics. I still take classes whenever I can.

After someone was a jerk online last week, one piece of advice I always share with creator friends kept echoing in my head.

“You should hire an editor.”

While I still don’t think it’s right to be an asshole on online (people brush it off, but studies show online negativity can have a heavier impact than face-to-face interactions), I’ve been wondering why this tiny bit of advice was so controversial for some.

But that reaction did get me thinking about one thing I’ve noticed in the past 7 years in fiction/comics/blog editing and writing.

Letting others look at your work is difficult.

There’s a fear there, one that I often share, that if you let someone else influence your work or point out the flaws, they’ll end up chipping away at the parts of the work that make it yours.

While I understand that fear, I don’t think it’s completely true. You do have to grow thick enough skin to know when and where to stand up for your work, but most of the time your editors, writer friends, and artist friends giving feedback want to enhance your message.

But every time I get my nerve up and offer my scripts or stories up for critique, the work gets better, not worse. My editors and friends notice small details I can fix, characters I can deepen and imagery I can strengthen. As long as I stick to my guns, my voice does not get lost in the editing process.

I used to think when I said, “You should hire an editor,” I was trying to self-promote. I thoroughly enjoy the process of editing and helping others present their best possible story. But when I give that advice, even if I’d love to edit for my friends/acquaintances, that’s never my aim.

I don’t care if they hire me. I want them to seek feedback because I know it’ll help improve their story, and possibly, their writing process. It’s always helped me put a better foot forward with my own stories.

Putting yourself out there is hard, but worth it.

It’s also necessary for growth. And it’s often essential in comics because you usually work with a creative team.

Building the muscles for taking and integrating feedback will help you work with others. I’ve edited for people who are generous and kind, even when they have a conflict with the feedback I’ve shared. I’ve also given input to writers early in their careers who don’t think they need any help. These are always instances where they asked me to edit or review their work, so it was never unsolicited critique.

Learning to take feedback with equal parts grace and stubbornness is a good skill to have. Stand by what you want to keep in your story and fix what you can to make it better.

Schedules, Inspiration, and Words Per Day: Have You become Your Own Worst Taskmaster?

Maybe you’ve got a great idea, a story tumbling around in your creative brain just waiting to see life on the page. Maybe you’ve written a few things but are ready for a bigger challenge like a collection of short stories, an instructional book, or a novel. Your project is bigger than anything you’ve done before and you’re unsure how to tackle it. You’ve researched articles and talked to other writers.

The advice is abundant, but one thing keeps poking through: Daily Word Count. Great novelists do it, amateur writers do it, blogs and ‘How To’ lists espouse it.

Three hundred, five hundred, a thousand words per day; it’s often referred to as the Golden Rule to successful writing. You try it, and it goes fine for a few days, then something comes up and you miss a day, then you get back to it with fewer words, and a downward spiral begins until you look back with a heavy sigh to acknowledge that your word count goal failed. You feel like you’re not cut out to be a writer, after all, you can’t even complete the basic task necessary to succeed.

Stop.

Clear your mind.

Analyze.

Revisualize.

Don’t become that boss who walks in with a list of tasks and no idea how things really work on the ground level.

Does a “Words Per Day” Goal work for you?

Words per Day is general advice given by a broad spectrum of writers whose lives aren’t like yours. Just like you’d never take on a competition body builder’s work out routine to get back in shape, don’t take on a professional novelist’s daily word count. It’s likely that their lives aren’t like yours. Even if you have committed to writing full-time, you may want to look at your habits.

Find What Works for You

What should you do then? Instead of racing to impose some arbitrary daily word count on yourself, start with looking at what your schedule. Take a look at the stuff that goes on the calendar: work schedule, family obligations, and routine things that need to be done.

Think about the less obvious things like holidays and shopping, social events, and the work that keeps your home going. These things don’t follow a specific schedule but are necessary and can pile up on you before you can say, ‘Oh no! It’s my sister’s birthday this weekend and I haven’t even thought about a gift!’.

When you can visually look at your life in these terms, it’s easier to see your time flow. Don’t stop there and start filling in the blank spots with words per day. Look a little deeper. Think about the times of day you feel your best mentally. When does your mind feel free? Does your mind never feel free? It’s important to know these things because if the rest of your life is on fire, no amount of advice or tricks will help you with your writing project.

Figure Out What You Can Trim

Time management is at the heart of the matter and understanding how it applies to you, your writing project, and your life specifically is so important.  Once you’ve analyzed how you use your time, you can look at how you can reorganize your time. You can trim up some loose ends, identify some time wasters, and get ahead of some of the things that languish until the last minute.

When the train is rolling on smooth track, it’s less likely to derail. When life is rolling more smoothly, you can consider what kind of word count goals you want to make. You may find that an alternate schedule of words works better for you.

Maybe it’s “X” amount of words per week because some of your days are jam packed with necessary things. Maybe you set a monthly word count goal because your weekly schedule has some expected unpredictability in it. Whatever you find, you can be confident that it uniquely fits your life. From there, you can modify and change it as you go along to better suit your project goal.

As always, get to know yourself and be kind along the way.

Creating a Basic Social Media Strategy

A lot of artists and creators I work with find social media daunting. What most people don’t realize is that running social media accounts can be a job unto themselves. For the last few years, I’ve helped clients grow their social media platforms with some basic strategies, and I wanted to share those tactics with you.

Start with One Platform

It can be tempting to start a Facebook page, a Facebook group, a Twitter, and an Instagram account for yourself or your brand all at once, but you will often find that yourself drowning in all the pressure to create content for all those platforms.

Start with one platform that fits your industry well. For example, the educational company I worked with used Facebook because many teachers use that platform. My artist friends tend to use Twitter or Instagram. Most of my comic writing buddies are on Twitter. Figure out where you can network and build an audience and start with that platform first.

You will also want to tailor your content to that platform, which we will discuss in the next section. Once you feel comfortable with your first platform, consider adding on a second social media account.

Create Your Calendar and Batch Your Content

The key to building a social media following is consistency. For clients in the past, I’ve started at the beginning of the month and mapped out content for their platforms. I’ve mapped out the content based on what socials they want to grow. I have even printed off calendars and created color-coded plans to know exactly what to create and when to post it.

You can figure out how often you want to post and what you should be posting by doing a bit of research. If you post too much or too little, it can impact your account negatively on some platforms, so be very careful with that. It can also be seen as spam by your audience if it’s not well thought out.

On average, here is a good rule of thumb for posting on different platforms:

Facebook3 Posts Weekly
Twitter3-30 Posts Daily
Instagram1-2 Posts Daily
Pinterest3-30 Pins Daily
LinkedIn2 Posts Weekly
YouTube1 Video Weekly

You’ll also want to consider how you want to use hashtags in your posts. Using too many hashtags on some platforms can be seen as spam, but platforms like Instagram use hashtags to help filter content to their users.

For me, I often print off or use a digital calendar to plan out posts for one or more platforms.

Engage with Your Audience

Posting is only half the battle. You have to follow people back, engage with their content, and build relationships to grow your following. If you post a question or something that leads a discussion, make sure to go back and engage with those that respond to you. If you treat social media like a one-way street, it will be more challenging to grow your following.

If engaging with others feels daunting, set a daily goal for engagement. Reply/comment 5-10 times a day, which should only take a few minutes if you do it all in one go. People love to feel seen and valued, so engaging with them is a great way to do just that.

Keep Going

Social media accounts take time to grow. If an account has several thousand followers, you can bet it did not happen overnight. There have been times it felt like I was posting to crickets, but as long as I stuck to it and engaged with those around me, eventually, things started to grow.

Creativity in Crisis: Abandoned by your Muse

Guest Post from Roth Heisner

It’s been nearly a year since life, as we knew it, changed drastically. From the onset of a global pandemic to social unrest, topped off with a stormy political season, it feels as though the crisis level never went down. Many have found themselves working from home, or not at all, as unemployment surged. Suddenly many creatives found themselves with something they had always wanted but never seemed to have enough of before: time. People settled into long-term lockdowns and new home offices and turned their eyes to all the things they wanted to do but never had time for, only to find their creativity seemed to have abandoned them. I am one of those creatives, and I would like to share what I learned about loss, uncertainty, and creativity in unprecedented times.

Shifting Away from Silver Linings and into Small Actions

After realizing that my small independent contractor business wasn’t going to survive the pandemic lockdown, I immediately jumped to a ‘silver lining’ frame of mind. I told myself that I had all the time I always needed to draft story ideas, develop characters, and render art that had languished untouched. What I immediately found was that my muse had gone. No matter how often I sat down to work on ideas, there just wasn’t any inspiration for the creative projects that I had longed to do. My creativity had died in the mire of uncertainty and a feeling of being lost. I no longer had the schedules, clients, or social engagements to keep me going.

The ‘death’ of life as I had known it had changed everything, and I didn’t have a direction to go. I found myself wrestling with the loss for months, piling guilt on top of it to no resolution until I made the firm decision that just because I couldn’t do what I thought I should be doing with my time, I could still be doing something. Something is always better than nothing. If I couldn’t unblock my mind, I could unclutter my environment. I started a project to organize my home.

Clearing the Clutter and Renewing the Spirit

It seemed like such a practical and uninspiring thing to do, but what I found was that the more I did it, the lighter I felt inside. My space was opening, and along with it, my mind. I found notes, drawings, and letters that reconnected me to events of my past. I found myself mentally skipping through places of my youth and calling old friends. By the time I had finished, months later, I not only had a clean, organized home, but I also had a renewed spirit and a well of revisited experiences to draw from creatively.

I’m confident I’m not the only creative person to have found themselves lost in this drastically changed world. To those who have also wondered where their inspiration has gone just as they found themselves with the time, I’d just like to say; don’t underestimate the loss you’ve endured. Surely as our lifestyles have been locked down and reigned in, so have our spirits. Be kind to yourself. Understand that these unprecedented times affect us emotionally. Divert your attention from the projects you feel you ‘should’ be doing and try something different. It doesn’t have to be cleaning your space, it could be trying a new creative medium, a new hobby or activity, or reading more instead of writing.

Let the well replenish and you’ll find yourself with renewed vigor, a new perspective, and undoubtedly some new creative ideas too!

6 Feet Apart – Short Comic

One of my goals this year is to draw 3 short comics. I plan to write a lot more short comic scripts this year, but I wanted to try out the entire process of comic creation.

We’ve spent most of the last year inside, but I live in an area where a lot of people think the pandemic is a hoax. I created this comic to speak to how isolating that feels.

Resources for Comic Creators – Scripts, Advice, and Classes

After writing for years, when I pivoted toward comics, it surprised me that there was no real “standard” way to write and create a comic. There are common practices and trends, but it’s an area that provides the writer/creator with a lot of freedom. I always want to share what I’ve learned because I firmly believe that rising tides lift all boats, so I thought I’d share some of the resources that have helped me over the last few years.

Scripts Archive – Comic Experience

This archive has a ton of different styles of scripts from a variety of authors. Ideally, if you want to study how comics work, I would download the script of your choice and read through it side by side with the comic that was created from it. One of the best ways to learn how to format a script is to look at these examples.

Ultimate Comic Writer’s Workshop – Kelly Sue DeConnick

I attended one of DeConnick’s workshops a few years ago and, I still refer back to my notes to this day. Someone on the internet was kind enough to compile her advice over on Tumblr in the link above. It has some great tips on improving your comic writing/comic observation skills and the nuts and bolts of creating comics.

Side note for writers: In the workshop I attended, DeConnick encouraged writers to submit shorts to anthologies. I followed her advice and got my first traditional publishing credit that way. If you’re looking to build your resume as a writer, it’s a great way to do just that.

Online Comic Classes Taught by Comic Creators

I’m not sure if it’s because I miss school or miss people, but I love taking short online classes right now. The shift to online learning has also made classes that might otherwise be taught at colleges or other exclusive places a lot more accessible. I’ve been able to take courses from writers, editors, and creators who have worked in the industry for decades.

Here are some of my favorite ( and often reasonably affordable) places I’ve taken classes:

  • TalentTalkLive – They offer various courses on comic creation and other subjects. Some are relatively cheap, considering you get to ask questions and learn from very talented professionals. I’ve gotten great value out of each class I’ve taken on their platform.
  • Skillshare – I’ve taken short classes on lettering, coloring, writing, and more at Skillshare! Not all of these classes center on comic creation, but most of them helped me improve my skills as a creator and learn new platforms.
  • The Hero Initiative – They sometimes offer live classes/experiences. They also support comic creators in need, so they’re a great platform to support.

Comics School

Gail Simone did a basic run-through of comics creation on Twitter during the start of lockdown in 2020. You can find PDFs of the daily lessons here. She walks you through how to create a springboard and then step-by-step create a short comic. You can also check out the #ComicsSchool hashtag on Twitter to find writers and artists who participated in Comics School. Many of them have gone on to create their own comics and sell their work.

Panels at Conventions

I miss going to in-person panels, but several conventions have moved their experiences online. I’ll be honest though, there’s nothing quite like watching a panel or taking a workshop face-to-face with a creator and then later being able to talk at their table (be mindful if people are trying to purchase items) or chatting at events surrounding the con. One of my favorite experiences was going to an after-party at a small con and just talking and having fun with many creators I admired. It made me feel like I had a place in the industry and that someday these folks could be my friends and colleagues.


I honestly can’t wait until we’re able to do it again, but for now, it’s a great idea to check out conventions that have moved their experiences online. It also gives you a chance to support conventions that support comics as an industry.

If there are other resources you think would help add to this list, please let me know and comment below!

CREATING A SUCCESSFUL AND SUPPORTIVE ONLINE COMMUNITY – PART 3: Branding and Growth

You’ve probably joined a community you were excited about, only to see it stall because the community was not very active, and no one was seeking to grow the community. If you’re lucky, your community might just magically grow on its own, but growth is a very intentional process most of the time.

Perfecting Your Branding

It may not feel intuitive at first, but branding and growth go hand in hand. This comes back to vision and community philosophies. Be specific and think carefully about how you word community descriptions, advertisements, and invites.

In terms of branding, I think carefully about names and descriptions when creating communities or helping clients develop communities. You want to keep things catchy but straightforward when it comes to titles. It may feel like you’re treating your community like a business, but overall, it can be a beneficial strategy and keep your stress levels low because it will ensure you keep things organized.

I often start by creating a color palette that I intend to use for community logos and graphics. There are tons of resources online to find different color palettes, try to pick something that matches your community’s vibe.

For one of my past communities, I picked a muted purple/grey/black palette. Early on, I got some push back from a few male members who felt like I should shift the colors to be more neutral or masculine. To my eye, it was already a neutral color scheme. A lot of women like purple, but it isn’t a gendered color like pink or blue. I was glad I stood my ground in the end. My community wasn’t the right fit for those guys who nitpicked the color scheme, and I had several male members over the years complimented the choice in color. 

All in all, reading up on intention branding and marketing is a great way to create a community that has “curb” appeal.

Growing Your Community

Start By Looking At Communities Like Yours

Take a look at communities like the one you have created and see if you can discern some of their growth strategies. Where do you see them advertise? What do graphics for the community look like? On places like Facebook Groups, a community with a good avatar, an excellent “About” section, and a clean/clear group banner may attract more members.. For Discord, because the use of graphics is less prominent, you might see if other servers have affiliates or advertise on spaces like Disboard (Disboard can help your community grow, but also watch out for bots/trolls/griefers, who frequently use the platform to join servers and start problems).

See what other community leaders do to grow their space and make it your own. You never want to copy another group/community, but it’s okay to look at well-run communities and use their strategies to inspire you to improve your own space.

Where to advertise?

Social media can be a fantastic tool to advertise your new community if you already have a following. If you have several followers on Twitter or Tiktok, put your community in your bio and promote it now and then.

Some social media communities also allow you to promote your community. I’ve seen this in some Facebook groups, where they have a day or a post where they allow others to promote/grow their community. Always read the rules of any group you join carefully before advertising your community. If you choose to promote when it is against the group rules, it’s a one-way ticket to being banned in most communities, and it’s not likely to help your growth much.

Affiliations with other communities like yours may also be an excellent way to go. Community owners may allow you to cross-promote your community if you have an official affiliation or one where you’ve developed a relationship with the community owners/staff. If you’re using a platform like Discord, you could do multi-server game nights or movie nights, which will invite people from an affiliated community to join and check out your space while keeping their entrance low-pressure and fun.

Affiliations will also help you learn a lot about your community and communities similar to yours. Working with other community leaders helped me learn about different tools and tricks to I could use improve my community. It can be tempting to feel like people with similar communities are your competitors, but I’d stay away from that mindset. Even if you serve the same audience, you’ll have different things to offer your members. Some people will choose one or the other, some will choose to join both. As long as you create a welcoming and productive space, people will join.

Giveaways are one growth strategy I tend to veer away from for community growth. Yes, they might cause people to join in the short term, but they’re joining for the wrong reasons. They’re joining to win a product, so once the giveaway is over, they’re not super likely to stay invested in your community.

Open Vs. Closed Invites – Pros and Cons

Open invites are when anyone can join at any time, and there’s little to no barrier for them to do so – Perhaps just a sign-up sheet or clicking a “join” button. Open invites can lead to faster growth, but it can cause people who aren’t very invested in your community to join. Outside of that, it can lead to spammers joining, especially on platforms like Discord. If you choose to do an open invite, remember, if people join and leave quickly, that’s okay. It’s more about keeping the quality members that join, rather than quantity.

Closed invites can cause slower growth, but having a barrier of some kind (questions to join, rules that a member has to agree to, etc.) can help ensure the members that join are the audience you want to serve.

In one of the Discord communities I’m in, for the pop culture website Soda and Telepaths, the owner has found an excellent growth strategy that rewards active members. Once a member has a certain amount of interaction with the Discord community, they are given a role with the ability to invite their friends to the server. This is a perfect way to reward people who engage with your community and get growth because the people who are inviting their friends are already active community members. Their friends will enter and likely already have people to socialize and interact with.

Check Out the Full Community Creation Series!

I’ve mapped three parts for this walkthrough, you can them check out here:

Part 1 – Rules, Philosophies, and Platforms

Part 2 – Moderation and Community Management

Part 3 – Community Growth and Branding

I plan to do blog posts on building a Discord community as well, including how to use bots, invites, and more! Subscribe for updates!